前回はフロント側のクラスまわりをカスタマイズしたのでその続きから始めます。
受注管理あたりをカスタマイズすることになります。
Contents
テンプレートファイルの修正
ディレクトリ内の『Smarty/templates/admin/』に管理画面系のテンプレートファイルが保存されています。修正するときはバックアップを取ったほうが良いと思います!
カスタマイズファイル:admin/order/edit.tpl
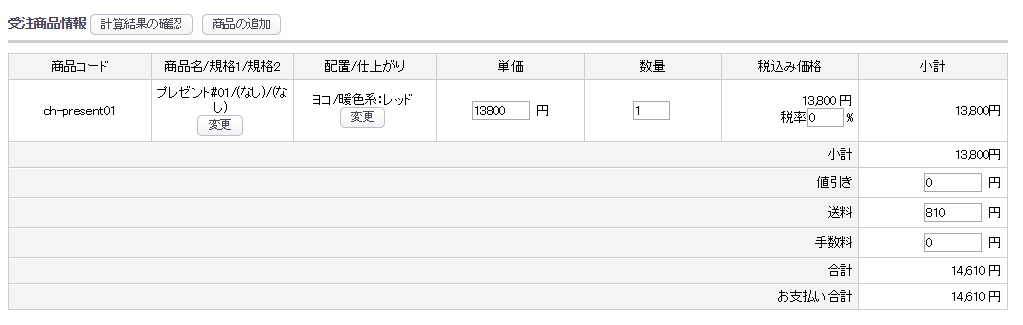
受注情報のテーブルに追加する感じにしました。変更ボタンからポップアップで編集します。
①105行目付近に追加。後述してますが、編集のポップアップで選択された値を挿入します。
    <input type="hidden" id="add_product_id" name="add_product_id" value="" />
    <input type="hidden" id="add_product_class_id" name="add_product_class_id" value="" />
    <input type="hidden" id="select_shipping_id" name="select_shipping_id" value="" />
    <input type="hidden" id="edit_product_id" name="edit_product_id" value="" />
    <input type="hidden" id="edit_product_class_id" name="edit_product_class_id" value="" />
<!--{* 【追記】 *}-->
    <input type="hidden" id="add_position_id" name="add_position_id" value="" />
    <input type="hidden" id="add_finish_id" name="add_finish_id" value="" />
    <input type="hidden" id="edit_position_id" name="edit_position_id" value="" />
    <input type="hidden" id="edit_finish_id" name="edit_finish_id" value="" />

    <input type="hidden" id="no" name="no" value="" />
    <input type="hidden" id="delete_no" name="delete_no" value="" />
②422行目付近に追加。1列追加しているので、小計や合計のcolspanを1つ増やします。
<input type="hidden" name="product_class_id[<!--{$product_index}-->]" value="<!--{$arrForm.product_class_id.value[$product_index]|h}-->" id="product_class_id_<!--{$product_index}-->" />
<input type="hidden" name="point_rate[<!--{$product_index}-->]" value="<!--{$arrForm.point_rate.value[$product_index]|h}-->" id="point_rate_<!--{$product_index}-->" />
</td>
<!--{* 【追記】 *}-->
<td class="center">
<!--{$arrForm.position_set.value[$product_index]|h}-->/<!--{$arrForm.finish_set.value[$product_index]|h}-->
<input type="hidden" name="position_set[<!--{$product_index}-->]" value="<!--{$arrForm.position_set.value[$product_index]|h}-->" id="position_set_<!--{$product_index}-->" />
<input type="hidden" name="finish_set[<!--{$product_index}-->]" value="<!--{$arrForm.finish_set.value[$product_index]|h}-->" id="finish_set_<!--{$product_index}-->" />
<br />
<!--{if $tpl_shipping_quantity <= 1}-->
<a class="btn-normal" href="javascript:;" name="change" onclick="eccube.openWindow('<!--{$smarty.const.ROOT_URLPATH}--><!--{$smarty.const.ADMIN_DIR}-->order/product_select.php?no=<!--{$product_index}-->&order_id=<!--{$arrForm.order_id.value|h}-->&shipping_id=<!--{$top_shipping_id}-->', 'search', '615', '500', {menubar:'no'}); return false;">変更</a>
<!--{if count($arrForm.quantity.value) > 1}-->
<a class="btn-normal" href="javascript:;" name="delete" onclick="eccube.setValue('delete_no', <!--{$product_index}-->, 'form1'); eccube.setValue('select_shipping_id', '<!--{$top_shipping_id}-->', 'form1'); eccube.setModeAndSubmit('delete_product','anchor_key','order_products'); return false;">削除</a>
<!--{/if}-->
<!--{/if}-->
</td>
<td class="center">
<!--{assign var=key value="price"}-->
<span class="attention"><!--{$arrErr[$key][$product_index]}--></span>
<input type="text" name="<!--{$key}-->[<!--{$product_index}-->]" value="<!--{$arrForm[$key].value[$product_index]|h}-->" size="6" class="box6" maxlength="<!--{$arrForm[$key].length}-->" style="<!--{$arrErr[$key][$product_index]|sfGetErrorColor}-->" id="<!--{$key}-->_<!--{$product_index}-->" /> 円
</td>
カスタマイズファイル:admin/order/product_select.tpl
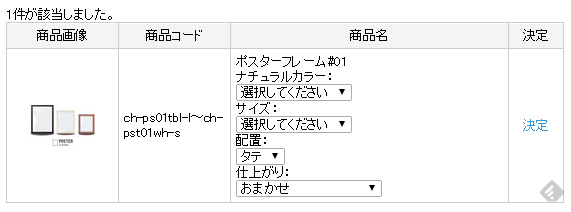
変更ボタンからのポップアップ画面はこんな感じです。商品の変更も追加も同じフォームなので両方に対応するようにカスタマイズします。
①39行目付近に追加。決定をクリックした時に親フォームの『edit.tpl』内に値を挿入する。
var product_class_id = document.getElementById("product_class_id" + product_id).value;
var opner_product_id = 'add_product_id';
var opner_product_class_id = 'add_product_class_id';
var tpl_no = '<!--{$tpl_no}-->';
var shipping_id = '<!--{$shipping_id}-->';

//【追記】
var position = "position_set" + product_id;
var finish   = "finish_set" + product_id;

var position_id = document.getElementById(position).value;
var finish_id   = document.getElementById(finish).value;

var opner_position_id = 'add_position_id';
var opner_finish_id   = 'add_finish_id';


if (tpl_no != '') {
    opner_product_id = 'edit_product_id';
    opner_product_class_id = 'edit_product_class_id';
    fm1.getElementById("no").value = escape('<!--{$tpl_no}-->');

//【追記】
    opner_position_id = 'edit_position_id';
    opner_finish_id   = 'edit_finish_id';

}
②91行目付近に追加。
fm1.getElementById(opner_product_id).value = product_id;
fm1.getElementById(opner_product_class_id).value = product_class_id;
//【追記】
fm1.getElementById(opner_position_id).value = position_id;
fm1.getElementById(opner_finish_id).value   = finish_id;

fm.mode.value = 'select_product_detail';
fm.anchor_key.value = 'order_products';
③ 268行目付近に追加。
    <input type="hidden" name="product_id" value="<!--{$id|h}-->" />
    <input type="hidden" name="product_class_id<!--{$id|h}-->" id="product_class_id<!--{$id|h}-->" value="<!--{$tpl_product_class_id[$id]}-->" />
    <input type="hidden" name="product_type" id="product_type<!--{$id|h}-->" value="<!--{$tpl_product_type[$id]}-->" />
<!--{* 【追記】 *}-->
    <!--{assign var=position_set value=position_set`$id`}-->
    <!--{assign var=finish_set value=finish_set`$id`}-->
    <dl>
        <dt>配置:</dt>
        <dd>
            <select name="position_set" id="<!--{$position_set}-->" style="<!--{$arrErr.position_set|sfGetErrorColor}-->">
            <!--{html_options options=$arrPOSITION selected=$arrForm.position_set.value}-->
            </select>
        </dd>
        <dt>仕上がり:</dt>
        <dd>
            <select name="finish_set" id="<!--{$finish_set}-->" style="<!--{$arrErr.finish_set|sfGetErrorColor}-->">
            <!--{html_options options=$arrFINISH selected=$arrForm.finish_set.value}-->
            </select>
        </dd>
    </dl>

    </td>
カスタマイズファイル:admin/order/disp.tpl
確認用の画面にも追加します。
①174行目付近に追加。1列増やしたので小計や合計のcolspanを1つ増やします。表示されるテーブルが固定幅で狭かったので、100%表示するようにcssもちょっと変更しました。
    <td class="center">
        <!--{$arrForm.product_name.value[$product_index]|h}-->/<!--{$arrForm.classcategory_name1.value[$product_index]|default:"(なし)"|h}-->/<!--{$arrForm.classcategory_name2.value[$product_index]|default:"(なし)"|h}-->
    </td>
<!--{* 【追記】 *}-->
    <td class="center">
        <!--{$arrForm.position_set.value[$product_index]|h}-->/<!--{$arrForm.finish_set.value[$product_index]|h}-->
    </td>
    <td class="right">
            <!--{$arrForm.price.value[$product_index]|number_format|h}-->円
    </td>
受注管理のフロントはこんな感じ。クラスファイルのカスタマイズが四苦八苦。うまくいかない。


1から読んでやっとここまでカスタマイズ出来た!!っと思ったら途中で終わってしまっているんですね><
是非続きもお願い致します!